
.svg)
.svg)
.svg)
Over 90% of all cyber-attacks begin with an email, making robust email security measures like SPF, DKIM, and DMARC essential.
Businesses using DMARC see a significant reduction in phishing attacks, with some reporting up to an 80% decrease.
Building on the urgency highlighted by these alarming statistics, this guide will provide detailed, step-by-step instructions on how to set up and check SPF, DKIM, and DMARC records.
By ensuring these security protocols are correctly configured, you'll be better equipped to defend your domain against email-based threats and reduce the risk of costly security breaches.
What is SPF Record
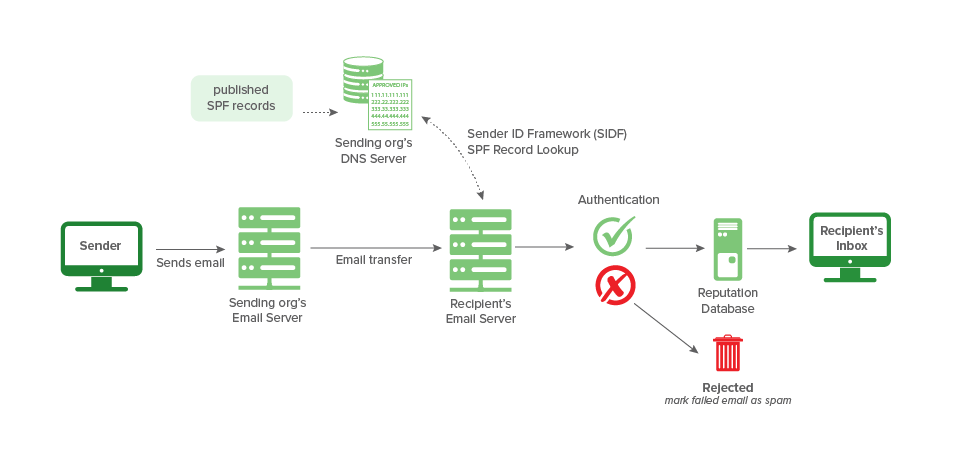
An SPF record (Sender Policy Framework record) is a type of DNS (Domain Name System) record that identifies which mail servers are permitted to send email on behalf of your domain.
By defining a list of authorized sending sources, SPF records help to prevent email spoofing, ensuring that only legitimate servers can send emails under your domain name.
This enhances email security by allowing recipient servers to check that emails claiming to come from a specific domain are sent from servers authorized by that domain’s administrator.
How to Set Up and Check SPF Record
Setting up and checking an SPF record are crucial steps in managing your domain's email security strategy. Here’s how to effectively manage both processes:
Setting Up an SPF Record
1. Identify Outgoing Mail Servers: Start by listing all IP addresses that are used to send mail from your domain. This includes your own mail servers and any third-party services you might use, such as email marketing platforms.
2. Create the SPF Record: The SPF record starts with v=spf1, which indicates the version of SPF used. After this prefix, you will specify the rules that describe who can send emails from your domain. For example:
v=spf1 ip4:192.168.0.1 include:mailserver.com -all- ip4:192.168.0.1 allows emails from this specific IP address.
- include:mailserver.com allows emails from any servers authorized by mailserver.com's SPF record.
- '~all' specifies a hard fail for any sources not previously mentioned, recommending that emails from other sources be rejected.
3. Publish the SPF Record: Add this record to your domain’s DNS settings as an SPF TXT record. This makes the record visible to external mail servers performing SPF record check on emails claiming to come from your domain
Checking Your SPF Record
1. Use DNS Lookup Tools: Tools like mxtoolbox.com or command-line tools such as dig or nslookup can be used to retrieve your domain's SPF record. For example, using dig, you would run:
dig +short TXT yourdomain.comThis command returns the TXT records for 'yourdomain.com', including the SPF record
2. Analyze the SPF Record: Ensure that the record contains the correct IP addresses, include statements, and the appropriate fail strategy (-all, ~all, ?all).
- -all (Hard Fail): Strongly advises rejecting emails from disallowed servers.
- ~all (Soft Fail): Suggests the email be treated with suspicion if it comes from a disallowed server.
- ?all (Neutral): Indicates that the server has no opinion about the legitimacy of the email.
3. Testing Email Delivery: After setting up your SPF records, send test emails to verify that they pass SPF record checker. Services like mail-tester.com can help analyze your email’s headers to ensure that SPF passes correctly.
What is the DKIM Record
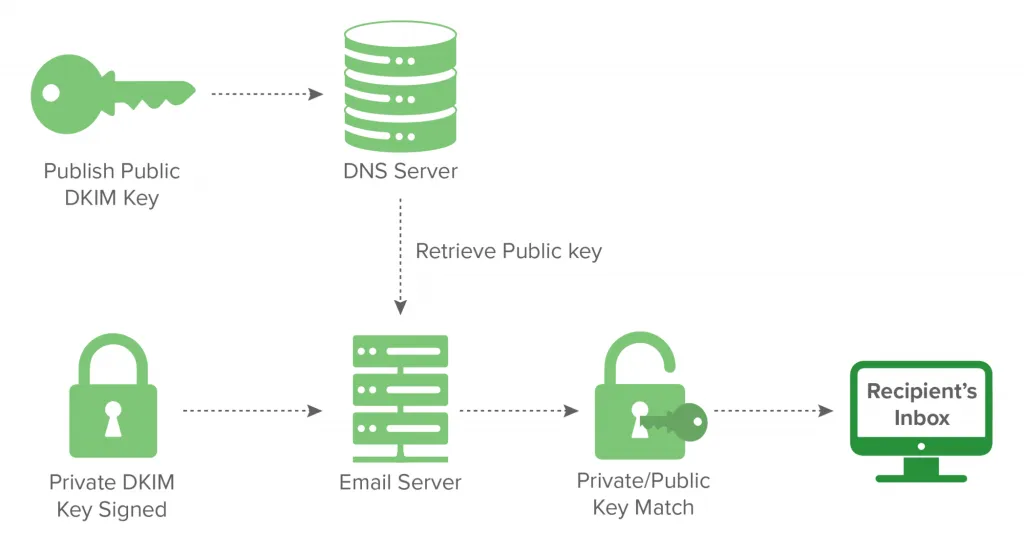
A (DomainKeys Identified Mail record) is a type of DNS record used to help ensure that email messages are not altered in transit between the sending and receiving servers. It does this by allowing the sender to attach a digital signature to the headers of an email message.
This signature is then verified against a public cryptographic key located in the domain's DNS records. A DKIM record enhances the trustworthiness of email by proving that the content has not been changed after it was initially sent.
How to Set Up and Check DKIM Record
Setting up and verifying a DKIM record are vital steps to secure email communications and improve email deliverability. Here’s how to accomplish both:
Setting Up a DKIM Record
1. Generate DKIM Key Pair: Most email service providers offer tools to generate DKIM keys. You will get a public and a private key pair. The private key will be used by your email server to sign outgoing emails, and the public key will be published in your DNS for others to verify the signature.
2. Publish the Public Key: The public key is stored in your DNS as a TXT record. The name of this record is typically in the format selector._domainkey.yourdomain.com, where “selector” is a specific term or phrase that helps identify the key. This record might look something like:
v=DKIM1; k=rsa; p=MIGfMA0GCSqG...- v=DKIM1 specifies the DKIM version.
- k=rsa indicates the encryption algorithm used.
- p= contains the public key.
3. Configure Your Email System: Configure your email server to use the private key to sign all outgoing emails. This setting depends on the email server or service you are using.
Checking Your DKIM Record
1. Verify the DKIM Record with DNS Tools: Use tools like mxtoolbox.com or a command-line tool such as dig to retrieve the DKIM TXT record. For example:
dig +short TXT selector._domainkey.yourdomain.com- This returns the DKIM TXT record, allowing you to verify that the record is correctly published.
2. Email Test for DKIM Verification:
- To ensure that your DKIM is functioning correctly, send a test email to an address that can check DKIM, like check-auth@verifier.port25.com. This service will send back an analysis of your email, indicating whether the DKIM signature passed or failed.
- Tools like mail-tester.com are also effective for checking if your DKIM signature is validating correctly. These services provide detailed feedback on the email's headers and whether the DKIM signature was verified.
3. Regular Monitoring and Troubleshooting:
- Regularly check outgoing emails to ensure they are being signed. Problems with DKIM signing can affect email deliverability.
- If you change email servers or if your private key is compromised, you will need to generate new keys and update your DKIM records accordingly.
What is DMARC Record
A DMARC record (Domain-based Message Authentication, Reporting & Conformance record) is a type of DNS (Domain Name System) record that enhances email security by using SPF (Sender Policy Framework) and DKIM (DomainKeys Identified Mail) protocols.
It helps domain owners define how email receivers should handle emails that don’t pass SPF or DKIM checks. The purpose of a DMARC record is to protect against domain misuse and phishing attacks, ensure that legitimate emails are correctly authenticated, and provide reporting back to the sender about messages that pass and/or fail DMARC evaluation.
How to Set Up and Check DMARC Record
Setting Up a DMARC Record
1. Define Your Policy: Start by deciding what should happen to mail that fails SPF and DKIM checks. You can set it to:
- none: Monitor the traffic, no action on the failed emails.
- quarantine: Treat failed emails with suspicion and possibly quarantine them.
- reject: Block delivery of emails that fail the checks.
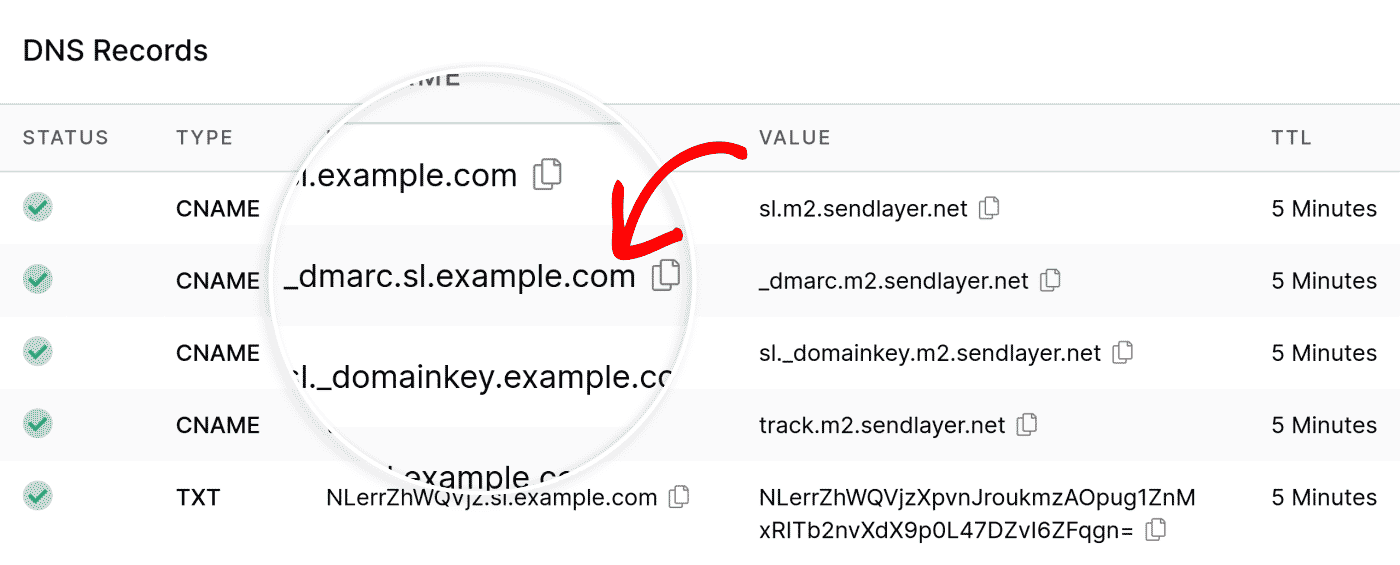
2. Create the DMARC Record: Your DMARC policy is published in your DNS as a TXT record at _dmarc.yourdomain.com. The format of a DMARC record may look like this:
v=DMARC1; p=quarantine; rua=mailto:report@yourdomain.com; ruf=mailto:forensic@yourdomain.com; pct=100; adkim=r; aspf=r;- v=DMARC1 indicates the DMARC version.
- p=quarantine is the policy applied to emails that fail the check.
- rua=mailto:report@yourdomain.com is the address for aggregate reports.
- ruf=mailto:forensic@yourdomain.com is the address for forensic reports.
- pct=100 means apply the policy to 100% of mail.
- adkim=r and aspf=r are alignment modes for DKIM and SPF, respectively, set to relaxed (r).
3. Publish the Record: Add the formatted record to your DNS settings as a TXT record. This allows external servers to verify the DMARC policy of your domain.
Checking Your DMARC Record and Mail Servers
1. Verify DMARC Record Using DNS Lookup Tools: Use command-line tools like dig or online tools such as mxtoolbox.com to retrieve your DMARC record:
dig +short TXT _dmarc.yourdomain.com- Analyze the Output: Confirm that the record exists and is correctly formatted according to your policy.
2. Monitor DMARC Record Check Reports: Regularly check the dmarc xml reports sent to the email addresses specified in your DMARC record. These reports will help you understand how your emails are being handled by various receivers and whether they pass or fail SPF, DKIM, and DMARC checks.
3. Test DMARC Validation: Tools like dmarcian.com or dmarcanalyzer.com offer services to check if your DMARC setup is working as expected by simulating sending and receiving processes.
4. Adjust Your DMARC Policy as Needed: Based on the analysis of DMARC reports and ongoing monitoring, refine your DMARC settings to optimize the handling of your emails, ensuring better deliverability and security.
Concluding Thoughts on Setting Up and Checking SPF, DKIM & DMARC Records
Ensuring robust email security is imperative in protecting against cyber threats. By properly setting up and routinely checking SPF, DKIM, and DMARC records for your particular domain, you create a solid defense that verifies emails sent from your mail server are secure and authentic.
This not only prevents email fraud but also strengthens your domain’s reputation by ensuring compliance with these critical protocols. Taking these proactive steps helps safeguard your business communications and shields your operations from potential security breaches.