
.svg)
.svg)
.svg)
Introduction to Office 365 Server
What is IMAP (Internet Message Access Protocol) in Office 365 Server
IMAP, or Internet Message Access Protocol, is a standard email protocol used for accessing and storing mail on a mail server.
In the context of Office 365 (now commonly referred to as Microsoft 365), IMAP allows users to access their emails from various devices, such as desktop email clients, smartphones, and tablets, ensuring that messages and folders are synchronized across all devices.
What is SMTP (Simple Mail Transfer Protocol) in Office 365 Server
SMTP, or Simple Mail Transfer Protocol, is the standard protocol used for sending emails across the Internet. In Office 365, SMTP is used to send outgoing emails from your Office 365 account to other email addresses, whether they are within the same Office 365 environment or external.
What is POP (Post Office Protocol) in Office 365 Server
POP, or Post Office Protocol, is another standard email protocol used to retrieve emails from a mail server. The latest version, POP3, is commonly used in email systems, including Office 365 (Microsoft 365). POP3 is designed to download emails from the Office 365 server to a local device (such as a computer or smartphone), and then, depending on the client's settings, it may delete them from the server.
What is an Error Message in Office 365 Server
An error message in Office 365 is a notification or alert that something has gone wrong within the system or with a specific action attempted by the user. Error messages can occur in various contexts, such as email sending/receiving, account login, application usage (like Word or Excel), or server communication. These messages are crucial for diagnosing and resolving issues within the Office 365 environment.
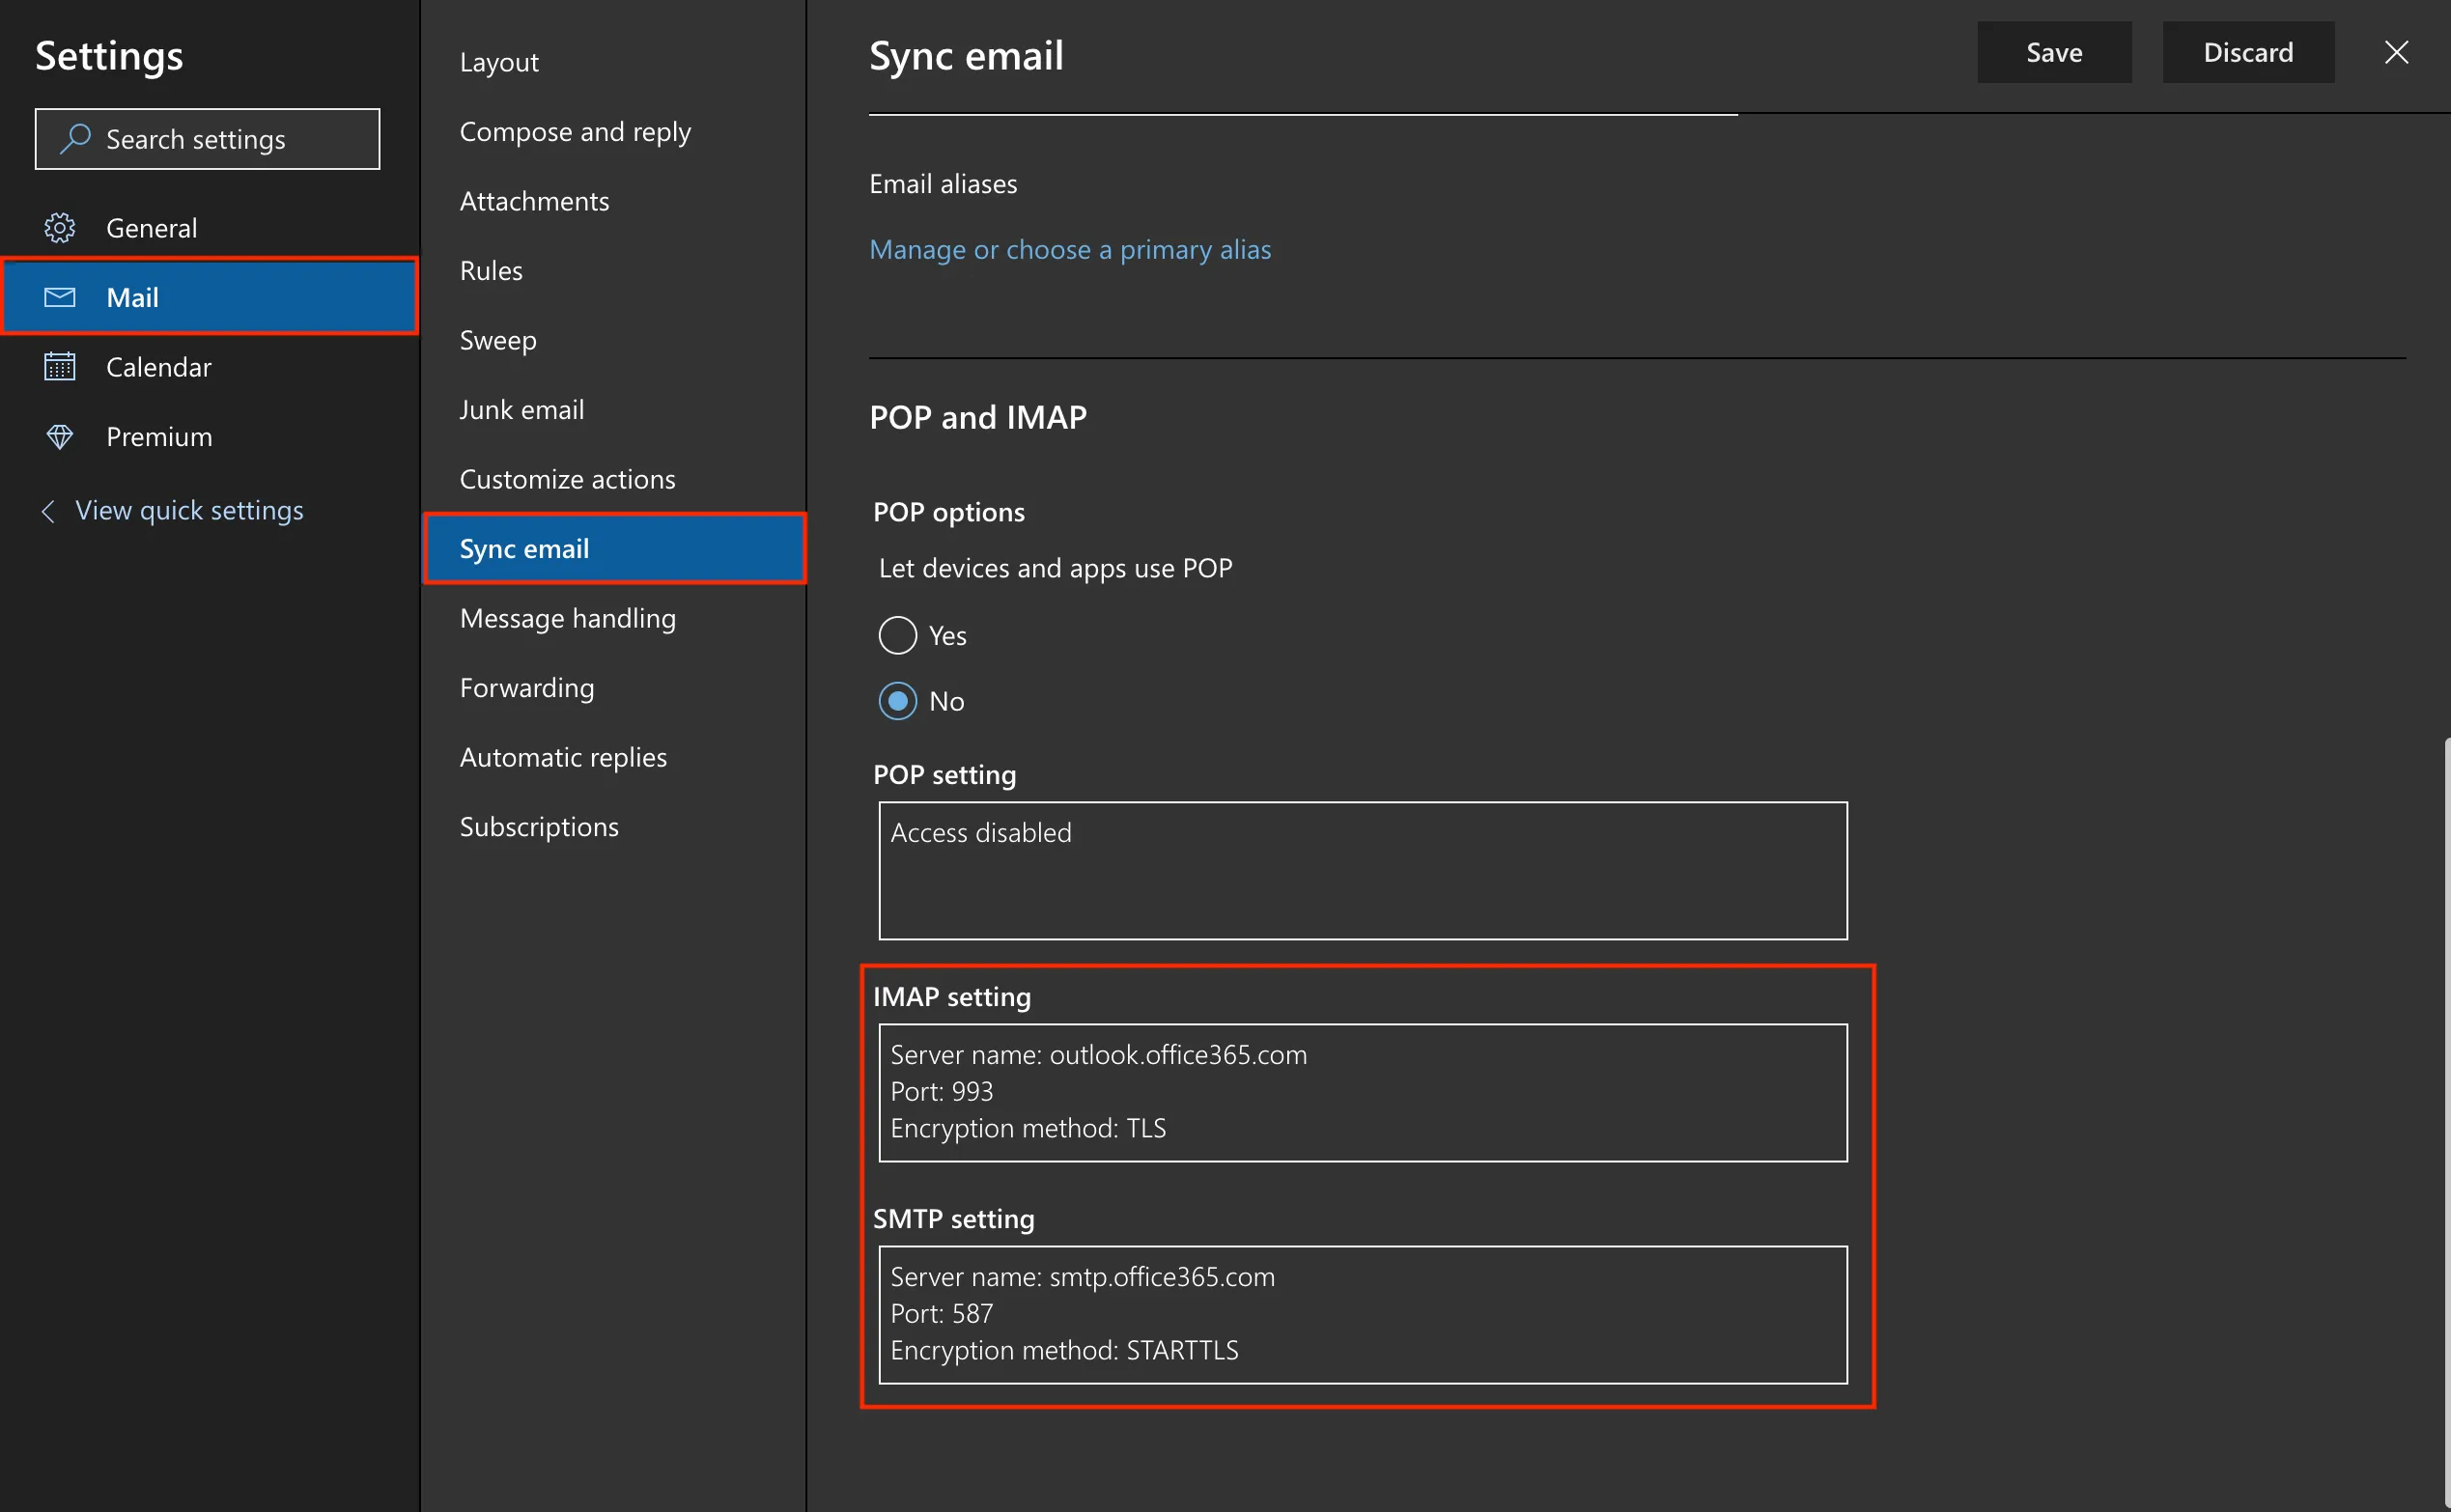
How Can You Find Office 365 Server Settings
Instructions for New Outlook
- Navigate to Office 365 Outlook Web Access, locate the Gear icon at the top-right corner, and choose "View all Outlook Settings."
- Select "Mail" from the options on the left, then choose "Sync mail" on the right side, and proceed to scroll down to the POP and IMAP section.
Instructions for Old Outlook
- Access Office 365 Outlook Web Access and click on the Gear icon located in the top-right corner, then choose "Options."

- In the left menu, under "Accounts," find and select "POP and IMAP" to obtain your IMAP server information.
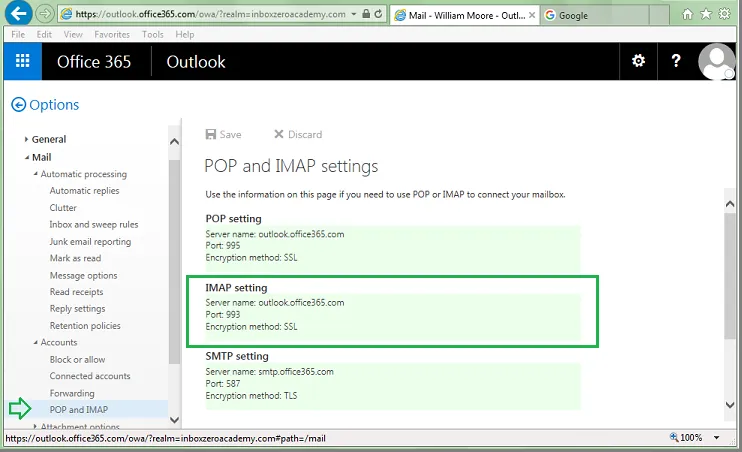
What Are the Office 365 SMTP Server Settings?
The SMTP server settings for Office 365 are essential for configuring your email client or application to send emails using your Office 365 account. Here are the standard SMTP settings:
- SMTP Server: smtp.office365.com
- Port: 587 (learn more about SMTP ports)
- Requires SSL: Yes
- Requires TLS: Yes (if available)
- Authentication: Yes (choose Login if multiple options available)
- Username: Your full Microsoft 365 email address (e.g. name@yourdomain.com)
- Password: This refers to the password linked to your Microsoft 365 email account, which was set by either you or your Microsoft 365 administrator at the time of the account's creation.
When setting up your email client or application, you'll need to enter these details to ensure that your outgoing emails are correctly sent through the Office 365 email servers.
It's also important to ensure that your Office 365 account is configured to allow SMTP connections, which might involve checking your account settings or consulting with your Office 365 administrator if you're part of a larger organization.
What Are the Office 365 Outgoing IMAP Server Settings?
The IMAP server settings for Office 365 are crucial for configuring your email client or application to receive emails from multiple devices and location using your Office 365 account. Here are the standard IMAP settings:
- Server: outlook.office365.com
- Port: 993
- Encryption method: TLS
- Username: Your full Microsoft 365 email address (e.g. name@yourdomain.com)
- Password: The password associated with your Microsoft 365 email address.
What Are the Office 365 POP Server Settings?
POP server settings used to configure your email client for retrieving emails from an Office 365 mailbox, are as follows:
- Server: outlook.office365.com
- Port: 995
- Encryption method: TLS
- Username: Your full Microsoft 365 email address (e.g. name@yourdomain.com)
- Password: The password associated with your Microsoft 365 email address.
How to Configure a Multifunction Device or Application to Send Emails via Office 365 Server
To configure a multifunction device or application to send emails using Office 365, you generally need to set it up with the correct SMTP (Simple Mail Transfer Protocol) settings. Every time your device sends an email, it’ll use your credentials. You can set up SMTP with or without multi-factor authentication (MFA).
Here's a step-by-step guide:
SMTP with MFA
1. Sign in to your Email & Office Dashboard
2. Enable SMTP Authentication for the user with the email address you're setting up on your device.
3. If you have security defaults enabled for your organization, disable it.
4. Enforce MFA for the user.
5. Set up an MFA authentication method for the user.
6. Create an app password. You’ll use the password to sign in to your printer or scanner.
- On your device or in its application, enter the following settings:
- Server name: smtp.office365.com
- Port: 587
- Encryption method: STARTTLS
7. Enter the app password to sign in to your account.
SMTP without MFA
1. Sign in to your Email & Office Dashboard
2. Enable SMTP Authentication for the user with the email address you're setting up on your device.
3. If you have security defaults enabled for your organization, disable it.
4. Disable MFA for the user.
5. On your device or in its application, enter the following settings:
- Server name: smtp.office365.com
- Port: 587
- Encryption method: STARTTLS
6. Enter your password to sign in to your account.
How to Enable SMTP Authentication
1. Sign in to your Email & Office Dashboard (use your GoDaddy username and password).
2. Select Manage next to the user.
3. Scroll down to Account information and select Advanced Settings.
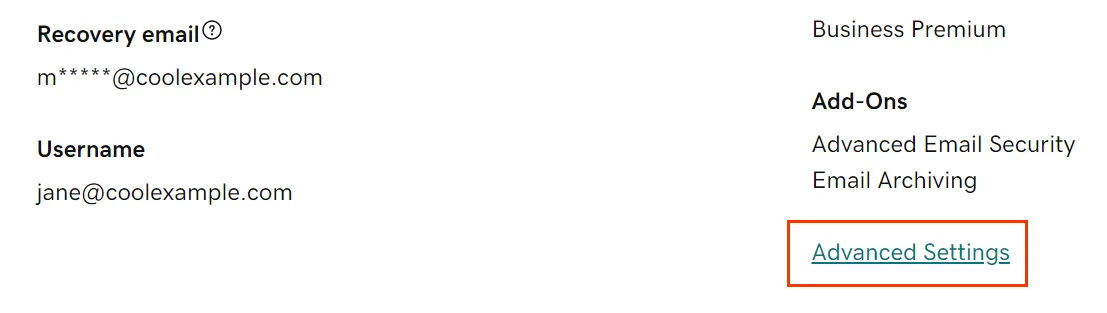
4. Turn on the SMTP Authentication toggle.
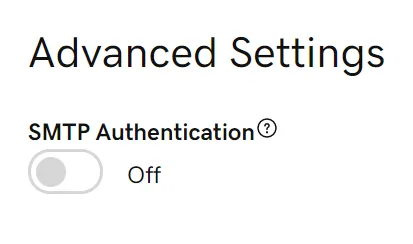
5. Select Continue to confirm you want to enable SMTP Authentication for this user.
How To Configure Microsoft 365 / Office 365 SMTP for WordPress Sites?
Configuring Microsoft 365 or Office 365 SMTP settings for a WordPress site enables the site to send emails using your Office 365 account, which can help improve email deliverability and professionalism. Here's a step-by-step guide on how to set this up:
1. Enable SMTP Authentication in Microsoft 365
For guidance on enabling SMTP authentication in Microsoft 365, please refer back to the relevant sections outlined
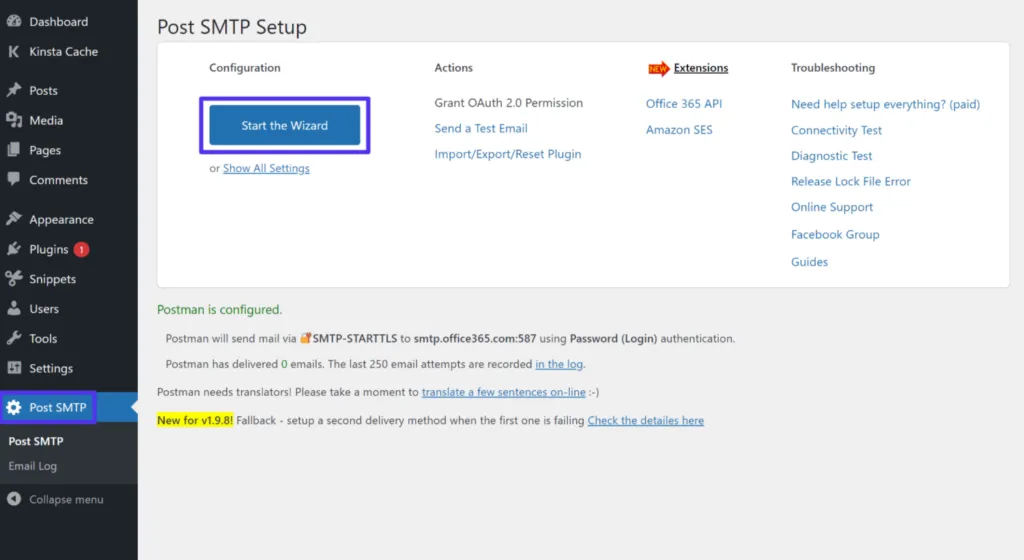
2. Install and Configure Post SMTP Plugin
Once you have enabled Authenticated SMTP from your Microsoft 365 admin dashboard, move on to your WordPress website and incorporate the Post SMTP plugin, which is freely available on WordPress
This plugin enables your WordPress site to dispatch emails through any designated SMTP server, specifically utilizing the SMTP settings of Office 365 in this scenario.
Following the plugin's activation, navigate to the newly appeared Post SMTP section within your WordPress dashboard and initiate the configuration wizard.
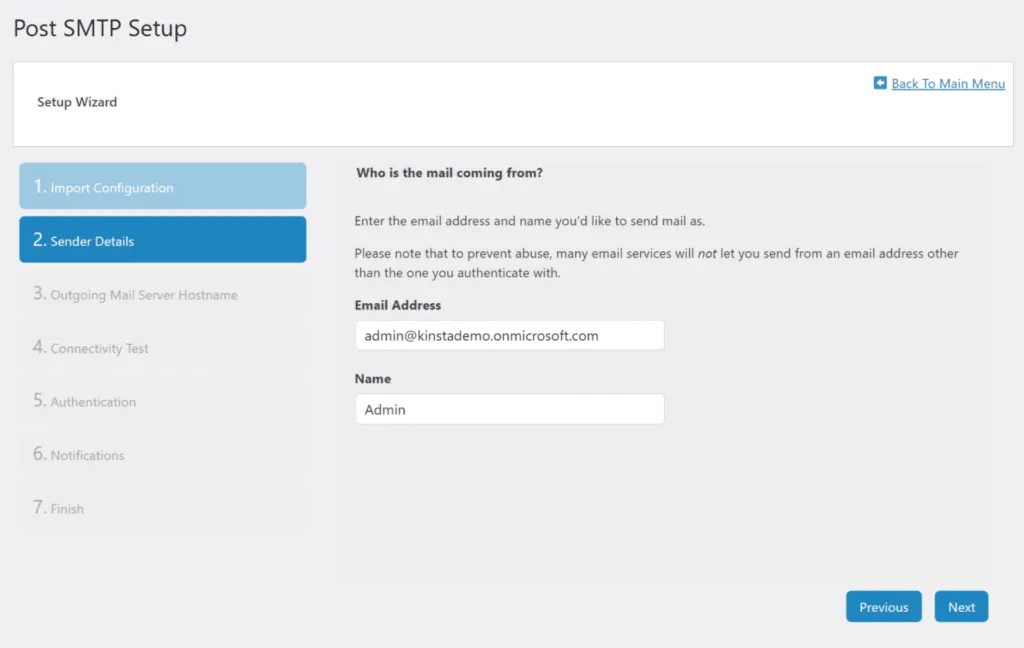
Within the "Sender Details" section, input your Microsoft 365 email address, which you've designated for SMTP email address purposes and have previously set up for Authenticated SMTP.
For the sender's name, input the desired display name for email recipients.
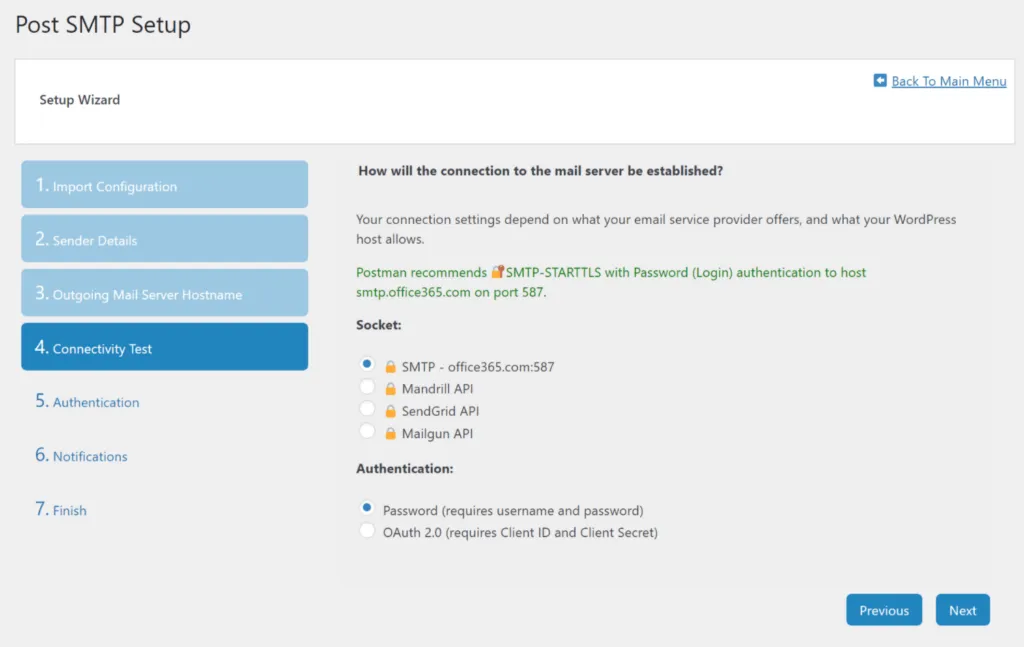
Continuing to the subsequent step, specify smtp.office365.com as your SMTP host, advancing to the connectivity assessment conducted by Post SMTP.
This evaluation aims to identify the most effective outgoing IMAP server settings and will present the recommended configurations upon completion:
- Select SMTP for the Socket option to ensure optimal connection.
- Opt for Password in the Authentication field to secure your email dispatches, with both settings typically chosen by default.
The following stage requires your Microsoft 365 email account details:
- Username: Your complete Microsoft 365 email account address intended for SMTP auth.
- Password: The corresponding password for this email account. Should you encounter a password error, a reset option is available through the Microsoft 365 admin center.
In the final phase of the setup, Post SMTP offers an option to configure alerts for any issues encountered while sending emails through Microsoft 365. If you choose not to activate notifications, simply proceed by clicking "Next" to finalize the setup.
By completing these steps, your WordPress site will be equipped to synchronize and send emails using the SMTP protocol through your Office 365 email account, enhancing your site's email reliability and integration.
3. Send a Test Email
To verify that your setup is functioning as intended, follow these steps to utilize Post SMTP's test email feature:
Step 1: Access Test Email Feature
- Navigate to the Post SMTP section within your WordPress dashboard and select the "Send a Test Email" option.
Step 2: Enter Your Email Address
- On the prompted page, input the email address where you wish to receive the test email from Post SMTP.
Step 3: Send the Test Email
- Execute the action to send the test email. If your setup is correct, a confirmation message will be displayed indicating the success of the email dispatch.
Step 4: Check Your Inbox
- Verify the receipt of the test email at the provided email address to ensure the configuration's effectiveness.
Step 5: Confirm Successful Configuration
- Upon receiving the test email, your configuration is confirmed to be correct, and no further action is required.
Step 6: Troubleshoot if Necessary
- If you do not receive the test email, consider consulting the subsequent troubleshooting section for potential solutions.
Troubleshooting Issues With Microsoft 365 SMTP on WordPress
Step 1: Verify Configuration Details
- Double-check all entered details, including SMTP email addresses, passwords, and port numbers. Even minor typos can lead to significant issues.
Step 2: Consult the Email Log
- Access the Post SMTP email log by navigating to Post SMTP → Email Log in your WordPress dashboard.
- Look for specific error messages that might indicate the nature of the problem.
Step 3: Enable SMTP Authentication
- If you encounter an error message indicating "Authentication unsuccessful, SmtpClientAuthentication is disabled for the Tenant," it suggests that SMTP authentication is not enabled for your email address.
- Return to the Microsoft 365 admin console and ensure that SMTP authentication is activated for the email account in use.
Step 4: Check Email Reception
- If emails are sent successfully but not received, they might be flagged as spam.
- Confirm that a custom domain is set up in Microsoft 365 and has been properly authenticated for email use, including DKIM setup.
Step 5: Avoid Using Default Subdomain for Live Sites
- Refrain from using the Microsoft 365 default onmicrosoft.com subdomain for actual site operations, as emails sent from this domain may be filtered or throttled by Microsoft 365.
Step 6: Set Up a Custom Domain
- Establish a custom domain name for your email account in Microsoft 365 to resolve any remaining deliverability issues.
How to Configure Outlook Web App with Office 365
Configuring the Outlook Web App (OWA) with Office 365 is allows you to access your email, calendar, contacts, and tasks from any web browser. Here's a step-by-step guide to help you get started:
1. Access Office 365
- Navigate to the Office 365 login page: Go to Office.com or Outlook.com, and sign in with your Office 365 email address and password.
2. Open Outlook Web App
- Access Outlook: Once logged in, click on the Outlook app icon from the Office 365 homepage or app launcher (the grid icon in the top left corner).
3. Configure Your Account (if needed)
- First-time setup: If it's your first time accessing OWA, you might be prompted to set your language and time zone. Follow the prompts to configure these settings.
4. Explore and Customize Settings
- Access Settings: Click on the gear icon in the top right corner to access your settings. Here, you can customize your email signature, set up automatic replies, and adjust other preferences.
- Email signature: In the settings menu, find the "Mail" section, then navigate to "Layout" > "Email signature" to create or modify your signature.
- Automatic replies: To set up automatic replies, go back to the "Mail" section, then find "Automatic replies" to configure out-of-office messages.
5. Manage Your Calendar
- Access Calendar: You can switch to the calendar view by clicking on the calendar icon in the bottom left corner or via the app launcher. Here, you can create, edit, and manage your appointments and meetings.
6. Contacts and Tasks
- Contacts: Access your contacts by clicking on the people icon at the bottom left corner or through the app launcher. Here, you can add, edit, and organize your contacts.
- Tasks: Access tasks by selecting the To Do icon from the app launcher or the tasks area in Outlook. You can manage your to-do lists, set reminders, and track your tasks.
7. Additional Features and Integrations
- Integrate with other Office 365 apps: OWA seamlessly integrates with other Office 365 apps like OneDrive, SharePoint, and Teams. You can access these apps from the app launcher.
- Use Office Online: Edit and create Word, Excel, and PowerPoint documents directly from your browser using Office Online, accessible through the app launcher.
8. Mobile Access
- Outlook Mobile App: For access on the go, download the Outlook Mobile App from the App Store or Google Play Store and log in with your Office 365 credentials.
Troubleshooting and Support
- If you encounter any issues or need further assistance, check Microsoft's support documentation or contact your organization's IT department for help specific to your setup.
Troubleshooting Common Office 365 Configuration Errors
SMTP Relay and Authentication Challenges
SMTP Relay Setup
SMTP relay issues can arise when an Office 365 account is not correctly configured to allow relaying. This can prevent applications and devices from sending emails through Office 365.
- Solution: To set up SMTP relay, you need to configure an Office 365 connector from your email server to Office 365. Ensure that your Office 365 SMTP relay settings are configured to authenticate using your Office 365 SMTP server settings, and verify that the IP address of your sending device or application is allowed to relay.
Authentication Requirements
Problems can also occur if the device or application sending the email cannot support the authentication requirements of Office 365.
- Solution: If your device or application does not support modern authentication methods, consider using an Office 365 account with an app password. This is a special password generated within Office 365 that can be used with applications that do not support multifactor authentication.
Mobile Device Connectivity Problem- Incorrect SMTP and IMAP Settings
IMAP and SMTP Configuration
Mobile devices can experience connectivity issues due to incorrect IMAP or SMTP configurations, affecting both incoming and outgoing emails.
- Solution: On your mobile device, ensure that the SMTP and IMAP protocol settings align with Office 365 requirements. Use the correct IMAP and SMTP server names, ports, and encryption methods as mentioned earlier. Also, ensure your SMTP password and username are correctly entered in your mobile email app settings.
Mail Flow Disruption
Incorrect DNS Settings
Mail flow problems in Office 365 can often be traced back to DNS configuration issues, such as incorrect MX record setup.
- Solution: Verify that your domain's DNS settings, especially the MX records, are correctly pointing to Office 365. The MX record should direct email flow to yourdomain.mail.protection.outlook.com. Any discrepancies can disrupt mail flow and should be corrected in your domain's DNS settings.