Introduction to Email Warm-Up
What Does Warming up an Email Mean?
Warming up an email involves gradually increasing the volume of emails sent from a new email account or domain to build a solid sender reputation. This process is crucial to avoid being marked as spam by email service providers and spam filters, ensuring that your emails reach the recipient's inbox.
- Establishing Trust: By sending a few emails initially and gradually increasing the number, you establish trust with mailbox providers. This is essential as sending too many emails too soon can trigger spam filters.
- Improving Deliverability: A well-executed warm-up process improves email deliverability. Statistics show that properly warmed-up email accounts can achieve inbox placement rates of over 90%.
What is Domain Reputation?
Domain reputation refers to the trustworthiness assigned to a domain based on its email sending history and how receivers have responded to those emails. It's a critical factor that email service providers and spam filters evaluate to decide whether an email should be delivered to an inbox or a spam folder.
- A good domain reputation increases the likelihood that emails will reach their intended recipients without being flagged as spam.
- A poor domain reputation can lead to emails being blocked or sent to spam folders, significantly decreasing deliverability rates.
Why You Need to Warm-up Email?
1. To Avoid Spam Filters
- Email service providers use sophisticated spam filters that assess the trustworthiness of an email sender. Starting with a low volume of high-quality emails demonstrates to these providers that you are a legitimate sender.
- Research indicates that warming up an email can reduce the chance of ending up in spam by up to 50%.
2. Increase Deliverability Rates
- Properly warming up your email helps in achieving better deliverability rates. For instance, during the warm-up phase, aiming for open rates of about 15-20% can set a positive precedent with email service providers.
- Gradual increases in email volume can lead to consistent inbox placement if managed effectively.
3. Enhance Email Performance
- As you warm up your email, you can track how different segments of your audience respond, which helps in optimizing the content and timing of your emails.
- Engaging content that prompts user interaction (opens, replies) during the warm-up phase is crucial. High engagement rates signal email providers that recipients value your emails, boosting your reputation.
4. Meeting Email Provider Requirements
- Many email service providers and spam filters scrutinize the behavior of new email senders more closely than established ones. A gradual warm-up process reassures these providers, decreasing the odds of being blacklisted.
- Email deliverability experts suggest that a well-planned warm-up schedule can increase the chances of achieving consistent inbox placement from the start.
5. Complying with Sending Limits
- New accounts often have lower sending limits. Warming up your email account enables you to increase these limits over time without triggering negative consequences.
- For example, some providers might allow a new account to send only 50 emails per day initially, but this limit can gradually increase as you demonstrate responsible sending practices.
How to Warm Up Your Email Domain Before Sending Cold Emails

There are two approaches to warming up your email account:
Method 1: Manually warm up your account.
Method 2: Use automation for the email warm-up process (recommended).
Manually Warm up Your Account

Warming up an email account manually is a strategic process that involves sending emails in a controlled and phased manner. This method allows you to directly monitor and adjust your approach based on the responses you receive, helping you effectively build your sender reputation before launching cold email campaigns.
Here's a detailed guide on how to manually warm up your email account using key strategies and considerations.
1. Initial Setup
Choose a Reliable Email Service Provider
Ensure your email service provider (ESP) has good infrastructure and a strong reputation itself. This choice can significantly impact your domain reputation.
Configure Email Authentication
Set up essential email authentication protocols like SPF (Sender Policy Framework), DKIM (Domain Keys Identified Mail), and DMARC. These help verify your domain's identity and improve your email deliverability.
1. SPF (Sender Policy Framework):
- SPF allows you to specify which mail servers are permitted to send email
- This is done by adding a specific SPF record to your domain's DNS settings.
- When an email is received, the ESP checks the SPF record to verify that the email was sent from a server allowed by your domain, thus reducing the likelihood of your email being flagged as spam.
2. DKIM (DomainKeys Identified Mail):
- DKIM provides a way to attach a digital signature to emails. When you send an email, your email server attaches a DKIM signature header to the message. This header is unique to your domain and verifies that the email has not been tampered with during transit.
- Receiving servers perform a DKIM check to ensure that the email signature matches the public DKIM key published in your DNS. This successful verification helps to build trust with ESPs.
3. DMARC (Domain-based Message Authentication, Reporting & Conformance):
- DMARC utilizes SPF and DKIM authentication techniques to instruct the recipient's mail server on how to handle emails if both authentication methods fail. Additionally, it provides feedback on how receivers have acted on the emails.
- Setting up DMARC helps you protect your domain from unauthorized use, such as phishing and spoofing. The feedback from DMARC reports can also be used to improve your email security posture.
2. Start with a Small Volume
Day 1-3: Send 10-15 emails to contacts who are likely to engage (e.g., colleagues, friends, or long-standing customers).
Personalize Your Emails
Increase the likelihood of receiving replies by personalizing your emails. Replies boost your reputation because they signal to ESPs that recipients welcome your emails.
Beyond just using the recipient's name, tailor the content to their interests or past interactions. If possible, reference a recent event or a mutual connection to enhance relevance.
Encourage dialogue by asking questions or requesting feedback on a relevant topic. This not only increases the chances of a reply but also fosters a genuine connection.
3. Gradually Increase Volume
Week 1: Increase to 20-30 emails per day, spreading them out over the course of the day to avoid sudden spikes.
Week 2-3: If the response is positive and there are minimal bounces and no spam complaints, double the volume every week until you reach the normal volume needed for your campaigns.
Begin with straightforward, text-based emails that are less likely to trigger spam filters than emails with multiple links or complex HTML designs.
As your sender reputation strengthens, gradually introduce more complex elements like images, rich formatting, and multiple links.
4. Monitor Responses and Adjust to Avoid Spam Folder
Pay attention to open rates, click rates, and reply rates. A high engagement rate is a positive indicator to ESPs.
Handle Feedback Promptly
Address any bounces or complaints immediately. Adjust your email list or content based on the feedback to improve future responses.
Many ISPs offer feedback loops that notify you when recipients mark your email as spam. Use this information to adjust your approach and avoid sending emails to those recipients.
Quickly adapt your strategy based on the feedback you receive, whether it's adjusting email content, frequency, or targeting.
5. Maintain Consistency
Establish and maintain a regular sending schedule. Consistency in sending emails helps ESPs recognize your email patterns, which is crucial for building trust.
Continuously deliver valuable and relevant content to maintain high engagement rates. This is crucial for maintaining your sender reputation.
6. Engage in Meaningful Conversations
Ask questions or encourage feedback within your emails. Engagement, especially in the form of replies, significantly boosts your sender reputation.
Engaging in conversation with recipients who reply to your emails further solidifies your reputation as a legitimate sender.
7. Provide Value in Every Email
Include tips, insights, or news that add value to your recipients' day. This encourages positive engagement and strengthens your email relationship.
Occasionally, it might be beneficial to include calls to action that offer value in exchange for interaction, such as a free ebook or access to exclusive content.
8. Engage in Reciprocal Interactions
Subscribe to and engage with newsletters from domains that are likely to reciprocate by interacting with your emails.
Become active in online communities and forums relevant to your industry. Share your email for newsletters or updates, encouraging organic growth in your recipient list.
9. Use Concise and Clear Subject Lines
Steer clear of terms that are commonly associated with spam, such as "free," "guarantee," or "no risk."
Make sure your subject lines accurately reflect the content of your email, avoiding misleading headers.
10. Maintain a Healthy Email List
Periodically remove unresponsive or inactive email addresses. Lower engagement rates can negatively impact your domain's reputation.
Utilize email verification tools to ensure that all addresses on your list are valid and active before you begin your campaign.
Use Automation for the Email Warm-up Process
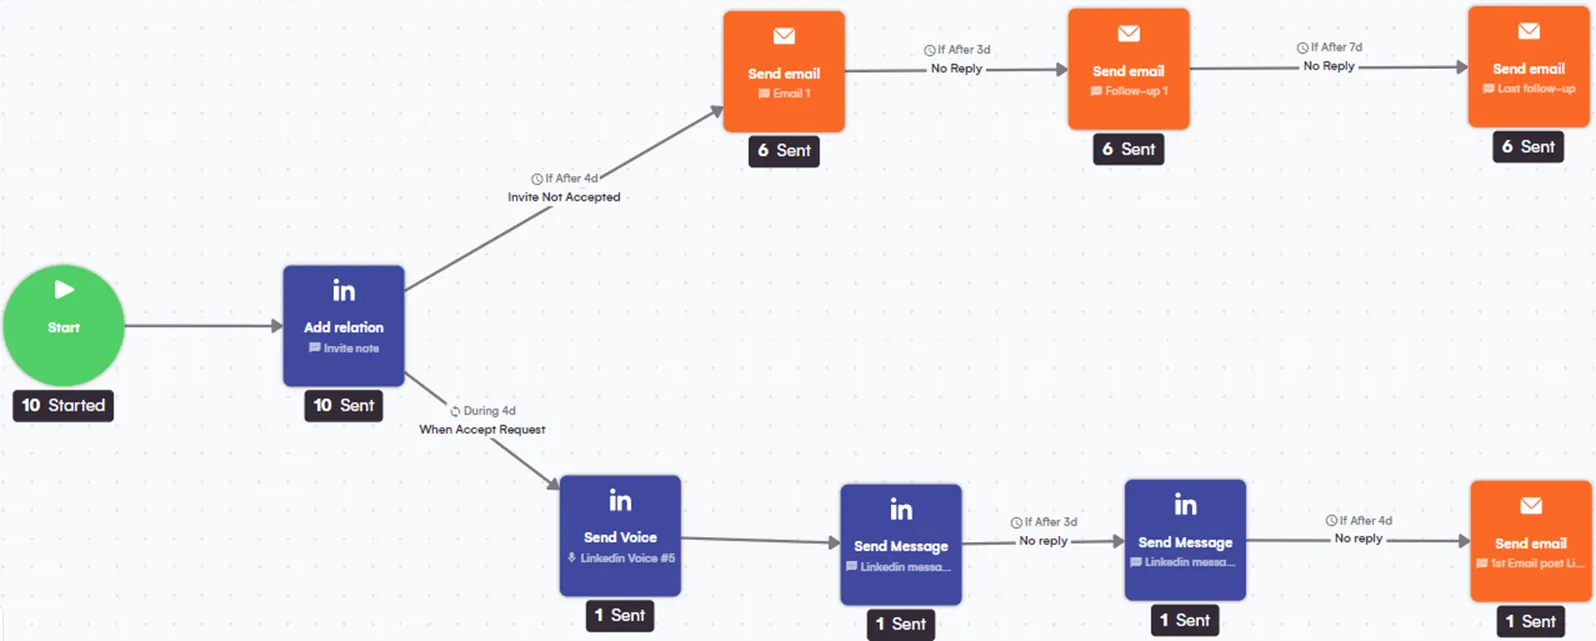
Automating the email warm-up process is the most efficient method to ensure your email account is properly prepared for sending bulk or cold emails. This approach eliminates the need for manual oversight as described in manual methods, allowing businesses and individuals to focus on other aspects of their email campaigns.
How Automation Works
Automated email warm-up tools take charge of gradually increasing the number of emails sent from your account. These tools use advanced algorithms to send emails on your behalf, carefully adjusting the sending volume based on engagement metrics such as opens, clicks, and replies.
This strategic escalation helps to establish a robust sender reputation, ensuring your emails are more likely to land in the primary inbox rather than the spam folder.
Useful Tools To Automate the Warm-up Process
1. TrulyInbox
TrulyInbox is an effective solution for those looking to automate their email warm-up process without much fuss. It's designed to handle multiple email accounts simultaneously, making it a good choice for both individuals and businesses.
Features:
- Connect unlimited email accounts.
- Fully automated setup.
- Advanced warm-up reports to track progress.
- Ability to adjust sending volumes with a single click.
- Sends highly personalized emails to minimize spam risks.
Pricing:
- Starter: $29 per month (billed annually)
- Growth: $79 per month (billed annually)
- Scale: $159 per month (billed annually)
- Business: $239 per month (billed annually)
2. Warmy.io
Warmy.io enhances your email sender reputation by automating interactions with emails that simulate real conversations. This tool supports multiple languages and can adapt to various topics, making it versatile for global use.
Features:
- Choose from various templates for warm-up.
- Automatically archives warm-up emails.
- Supports multi-language warm-up.
Pricing Plans:
- Starter: $49 per month
- Business: $129 per month
- Premium: $189 per month
- Expert: $279 per month
3. Mailwarm
Mailwarm offers a straightforward approach to warming up your email by interacting with a network of email accounts they manage. This can significantly boost your interaction rates, though it's important to ensure these interactions appear genuine to ESPs.
Features:
- Customizable reply and send schedules.
- Integration with major email service providers like Gmail, Outlook, and SMTP.
- Simple setup process.
- Daily insights into your warm-up progress.
Pricing Plan:
- Starter: $79 per month (1 Inbox)
- Growth: $189 per month (3 Inboxes)
- Scale: $549 per month (10 Inboxes)
How to Implement Automated Email Warm-Up
- Choose the Right Tool: Select an email warm-up tool that suits your specific needs. Popular tools often offer features like automated volume scaling, engagement tracking, and feedback analysis. Warm-up tools can be part of broader email marketing platforms or specific solutions dedicated to the warm-up process.
- Set Up Your Parameters: Configure the tool by setting the initial sending limits, growth rate, and target audience segments. The initial setup should reflect your long-term sending goals and the specific characteristics of your email list.
- Monitor the Progress: Even though the process is automated, it’s important to regularly check the progress and outcomes of your warm-up. Look at detailed reports on deliverability, open rates, and other relevant metrics to ensure the process is moving in the right direction.
- Adjust as Needed: Based on the insights gathered, you may need to tweak your warm-up parameters. This could involve adjusting the increase in daily sending limits or reshaping your audience segments to improve engagement.
- Integration with Overall Email Strategy: Ensure that your automated warm-up process is well integrated with your overall email marketing strategy. This includes aligning your content and outreach efforts with the stages of the warm-up to maximize effectiveness.
When is It Appropriate to Stop Warming up Your Email Account?
It's appropriate to stop warming up your email account when you have consistently achieved good deliverability rates without issues such as bounces, spam complaints, or being marked as spam. This typically means you’ve reached your target email volume and have maintained a stable, positive sender reputation for a sustained period, usually several weeks.
Additionally, ensure that engagement metrics such as open rates, click rates, and reply rates remain healthy as you increase your sending volume to your desired level.
Step-by-Step Guide to Warming Up a Cold Email List
1. Segment Your List:
- Initial Segmentation: Divide your list into segments based on the last engagement date. For example, those who haven't engaged within the last 6 months, 1 year, or more.
- Why It's Important: This allows you to tailor your re-engagement strategy to the level of "coldness". The less recent the engagement, the more cautious your approach should be.
2. Update and Clean Your Email List:
- Verification: Use email verification tools to ensure that all addresses are still valid, removing any that bounce.
- List Hygiene: Regular cleaning minimizes the risk of sending to invalid addresses, which improves your overall deliverability and reputation.
3. Develop Engaging Content:
- Relevant Offers: Create content that provides value and is relevant to the segment you're targeting. This could include special offers, updates, or news that might interest them.
- Personalization: Use any available data to personalize the emails, making them more appealing and likely to be opened.
4. Send a Re-engagement Campaign:
- Soft Approach: Start with a soft re-engagement email that reminds them why they signed up, what they’ve missed, or what’s new. Ask if they'd like to continue receiving emails and provide a clear option to opt-out.
- Feedback Request: Include a feedback form asking why they haven't been engaging. This can provide valuable insights for future content and strategies.
5. Monitor Responses and Adjust Accordingly:
- Engagement Tracking: Monitor which emails are opened, which links are clicked, and whether there are any replies. This data will help you adjust your approach as needed.
- Adjust Frequency and Content: Based on engagement, you might decide to increase the frequency of emails or continue with a gradual approach. Keep refining the content based on the interactions and feedback received.
6. Automate the Follow-Up Process:
- Email Automation: Set up automated follow-up emails for those who engage, perhaps moving them to a more active segment.
- Drip Campaigns: For those who haven’t engaged, consider a drip campaign with spaced-out emails that slowly build up the frequency, reducing the shock of sudden communication.
7. Evaluate the Campaign and Define Future Strategies:
- Campaign Analysis: After running the re-engagement campaign, analyze the overall performance. Look at how many re-engaged, how many opted out, and how the overall health of your email list has changed.
- Ongoing Strategy Development: Use the insights gained to refine your ongoing email marketing strategies. This might involve more regular clean-ups, segmentation adjustments, or content strategy overhauls.
How to Monitor and Improve Your Sender Reputation
Monitoring and improving your sender reputation is crucial for ensuring your emails consistently reach your subscribers' inboxes and not their spam folders. A solid sender reputation also helps in maximizing the effectiveness of your email marketing campaigns. Here’s a step-by-step method to monitor and improve your sender reputation:
Step 1: Understand Your Current Sender Reputation
- Use Reputation Services: Tools like SenderScore, Talos Intelligence, or ReputationAuthority provide insights into how ISPs view your sender reputation.
- Check Blacklists: Regularly check if your IP address is on any blacklists using services like MXToolbox. Being blacklisted can significantly impact your deliverability.
Step 2: Implement Proper IP and Domain Warm-Up Strategies
- IP Warm-Up: Gradually increase the volume of emails sent from a new IP address to build its reputation slowly. Start with a low volume and increase it incrementally to avoid being flagged as a spammer.
- Domain Warm-Up: Similarly, when introducing a new domain, start by sending small batches of emails and gradually increase the volume. This is crucial for ISPs to recognize and trust your new domain.
Step 3: Monitor Email Deliverability and Engagement Metrics
- Deliverability Monitoring: Tools like Return Path or Mailgun provide detailed reports on where your emails are ending up—be it the inbox, spam folder, or if they are being blocked.
- Engagement Metrics: Keep an eye on open rates, click rates, bounce rates, and unsubscribe rates. High engagement and low bounce rates positively influence your sender reputation.
Step 4: Optimize Email Content
- Avoid Spam Triggers: Refrain from using excessive links, risky keywords, and large images that can trigger spam filters.
- Content Quality: Ensure your content is relevant, engaging, and provides value to your subscribers. High-quality content is more likely to be opened and clicked, which positively affects your reputation.
Step 5: Maintain List Hygiene
- Regular List Cleaning: Remove inactive subscribers and email addresses that consistently bounce. Sending emails to non-responsive addresses can harm your sender reputation.
- Re-Engagement Campaigns: Periodically run re-engagement campaigns to maintain a healthy, active subscriber list.
Step 6: Use Feedback Loops
- Set Up Feedback Loops: Sign up for feedback loops with ISPs. This allows you to see who marks your emails as spam, and you can remove those subscribers from your lists to prevent further damage to your reputation.
Step 7: Authenticate Your Emails
- Implement SPF, DKIM, and DMARC: These email authentication protocols prove to ISPs that your emails are legitimate and reduce the likelihood of them being marked as spam.
Step 8: Analyze and Act on Feedback
- Act on Data: Use the data and feedback from all the above steps to make informed decisions about your email strategies. If certain tactics lead to lower engagement or higher spam complaints, adjust your approach accordingly.
Final Considerations for Warming Up a Dedicated IP Address
As you begin warming up your email domain, remember that patience and precision are key. Starting with a low volume and gradually increasing it ensures you build a trustworthy sender reputation. By following the steps outlined, you can enhance deliverability and performance, making your cold email campaigns more effective. Remember, a well-warmed email domain is your ticket to reaching more inboxes successfully.



.jpg)

.jpg)
