
.svg)
.svg)
.svg)
Introduction to Email Scheduling in Outlook
Understanding Outlook's Email Scheduling
Outlook isn't just a platform for managing your email messages; it's a comprehensive tool that enhances the way you handle professional communication.
A standout feature within the Outlook email account is the ability to schedule emails.
This underutilized feature can revolutionize how you manage your email interactions.
Why schedule an email?
Picture this: you have a meeting for up to two hours and need to send a message that’s optimal to be received during that standard business hours.
By utilizing the 'Delay Delivery' option in the message window, you can ensure your email is sent at the perfect moment, enhancing the efficiency of your communication.
How to Schedule an Email in Outlook: Basic Steps
1. Compose Your Email: Start a new message in Outlook and write your email

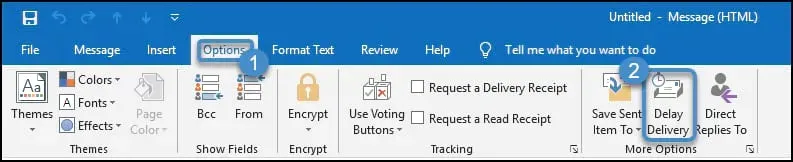
2. Access Delay Delivery: Click on the 'Options' tab in the new message window.
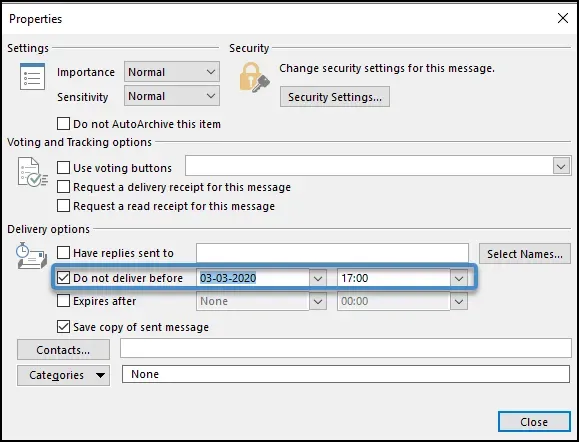
3. Set the Delivery Time: In the 'Delay Delivery' options, choose the 'Do not deliver before' checkbox and set your desired date and time for the email to be sent.
4. Save and Close: Click 'Close' to save your settings, then click 'Send'. The email will stay in the 'Outbox' folder until the scheduled time.

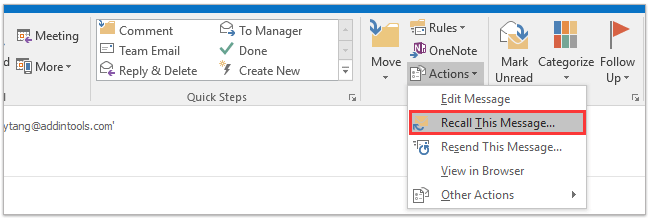
5. Edit if Needed: You can edit or delete the scheduled email in the 'Outbox' folder before the set delivery time.
How to Schedule Emails Across Various Outlook Platforms
Schedule Outlook Emails on Windows
- Step 1: Open your 'Outlook application' and create a new email.
- Step 2: In the email window, write your message.
- Step 3: Click on the 'Options' tab, then select 'Delay Delivery' under the 'More Options' group.

- Step 4: In the 'Properties' window, check the 'Do not deliver before' box and set your desired 'delivery date' and 'time'.

- Step 5: Click 'Send'. The email will move to the 'Outbox folder' and remain there until the scheduled time.
Schedule Outlook Emails on Mac
- Step 1: Start a new message in the Outlook for Mac application.
- Step 2: After composing your email, go to the 'Options' tab.

- Step 3: Click on 'Delay Delivery' and set the 'date' and 'time' in the dialog box that appears.

- Step 4: Send the email. It will stay in the 'Outbox folder' until the scheduled delivery time.
Schedule Outlook Emails on the Web
- Step 1: Log in to your Outlook on the web.
- Step 2: Compose a new email message.
- Step 3: Click the dropdown arrow next to the 'Send' button.

- Step 4: Choose 'Send later' and select the desired 'delivery date' and 'time'.

- Step 5: Click 'Send'. The email will be scheduled for delivery.
Advanced Email Scheduling Strategies in Outlook
Schedule Monthly and Weekly Emails in Outlook
Effective email scheduling in Outlook can significantly streamline your communication, especially when dealing with repetitive tasks like sending a 'scheduled message' or a 'message immediately'.
If your Mac mail is not working, this troubleshooting guide can help resolve common issues.
Here's how you can set up emails on a monthly or weekly basis:
- Draft Your Email: In the 'email window', compose the email you plan to schedule.
- Select Delay Delivery: Click on the 'Options' tab and find the 'Delay Delivery' button. This opens a 'Properties box' where you can customize your settings.
- Choose the Delivery Date: Set your preferred 'delivery date' and 'custom time' for when you want the email sent. This is ideal for 'email scheduling' on a recurring basis.
Manage Different Time Zones and Custom Delay Delivery Options in Outlook Email Scheduling
Scheduling emails across different time zones can be challenging, but Outlook's 'defer delivery' feature simplifies this process.
Here’s how to manage it effectively:
- Compose Your Email: Start by writing your email, keeping in mind the 'subject line' and the 'message options'.
- Access Delay Delivery: In the 'message window', click on the 'Options' tab and then on 'Delay Delivery'.
- Set Time Zone Considerations: In the dialog box, adjust the 'delivery time' to align with your recipient's time zone. If you're using the 'Outlook application', ensure to check the 'time zone' settings for accuracy.
Utilize Tags Group and Check Box for Email Automation
Mastering email automation in Outlook can be streamlined with the effective use of tags group and check box features. Here's how:
Tags Group: This feature in Outlook allows you to categorize your emails for easy organization.
When scheduling emails, assign relevant tags from the tags group to each message.
This way, you can effortlessly filter and manage your scheduled emails, whether they are in the drafts folder, outbox folder, or even after they've been sent.
Check Box for Automation: The check box is a tool for triggering automatic responses or actions.
For instance, you can set up a rule check box to automatically send a follow-up email if you haven’t received a reply within a specified time. This ensures that your email message remains on top of the recipient's inbox.
Craft Effective Subject Lines for Scheduled Emails
When scheduling emails in Outlook, the power of your subject line cannot be underestimated. Here's how to make it work for you:
- Be Direct: Use clear, straightforward language in your subject line. If it's a reminder, say so. For instance, “Meeting Reminder: Tomorrow at 10 AM” is direct and informative.
- Subject Line Relevance: Ensure the subject line directly reflects the content of your email. If you’re sending a scheduled email regarding a project update, include specifics like the project name or deadline.
- Personalization Works: Including the recipient's name or a specific reference can increase the chances of your email being opened. A subject line like “John, Your Weekly Project Report is Ready” is more engaging.
Secure Email Sending via SMTP Authentication to Message Immediately
Ensuring the security of your scheduled emails in Outlook is critical, especially in a professional setting. SMTP authentication is your tool for this.
- SMTP Authentication Basics: This is about verifying your identity as a sender. In Outlook, set this up in your email account settings. It’s about ensuring the email you schedule is actually sent from your account.
- Why It Matters: Without SMTP authentication, your emails could end up in spam, or worse, pose security risks. Especially for scheduled emails, you want them to land in the right inbox, securely and reliably.
- Setting It Up: Go to your account settings, find the SMTP options, and enter your credentials. This simple step significantly boosts the security of every email you send.
How to Manage Outlook's SMTP Server and Delivery Issues

Common SMTP Server Errors in Outlook
SMTP Error 451 (Temporary Local Problem)
- Solution: Wait and retry sending the email later. If persistent, check the scheduled email settings or the delivery date to ensure there's no delay in the delivery option inadvertently set.
SMTP Error 550 (Mailbox Unavailable)
- Solution: Verify the recipient's email address for accuracy. Check the message immediately for any typos or errors. Review the subject line for any forbidden or suspicious content.
SMTP Error 553 (Mailbox Name Not Allowed)
- Solution: Ensure the email address is formatted correctly. Check for any illegal characters in the email address
SMTP Error 421 (Service Not Available)
- Solution: Often a server issue, so try again later. If it continues, contact your email service provider. Ensure your Outlook application is updated to the latest version for optimal performance.
SMTP Error 452 (Insufficient System Storage)
- Solution: This error is typically on the server side. You may need to contact your email provider. Meanwhile, clean up your Outbox folder and drafts folder to ensure no large, unsent emails are clogging the system.
Port Blockages
- Solution: Check if your ISP is blocking the SMTP port (commonly 25, 465, or 587). You may need to switch to a different port or contact your ISP for assistance. Updating the port settings in your Outlook email account might be required.
Solutions for Delayed Message Delivery and Outbox Folder Issues in Outlook
Review Outbox Folder Settings: In Outlook, check the folder for any messages that haven't been sent. This could indicate a delay in delivery.
Check Delay Delivery Options: In the message window, verify if the 'Delay Delivery' option is accidentally applied.
Verify Email Message Size: Large email messages can get stuck in the outbox's folder. Reduce attachment size or compress files to facilitate smooth delivery.
Update Outlook Application: Ensure your desktop app version of Outlook is up to date.
SMTP Server Configuration: Double-check your Outlook email account settings to ensure the SMTP server details are correct, as misconfiguration can cause sending issues.
Resolving Confirmation Dialog Box Appears Errors
Review Confirmation Dialog Box Settings: Look for any options related to confirmation dialog boxes, especially under message options or when setting up a new message.
Check Scheduled Emails: Ensure that the schedule send feature isn't mistakenly triggering the confirmation dialog boxes.
Disable Problematic Rules: Access the 'Manage Rules & Alerts' in the Outlook ribbon. A specific rule might be causing the confirmation dialog box to appear, particularly those related to email scheduling or the outbox folder.
Inspect Drafts Folder: Sometimes, emails saved in the drafts folder with incomplete settings might trigger confirmation dialog boxes. Review and clear unnecessary drafts.
How to Efficiently Manage Scheduled Emails in Outlook

Organizing, Tracking, and Editing Scheduled Messages in Outlook
Dealing with a cluttered inbox or delayed message delivery in your Outlook email account?
Mastering the art of managing scheduled emails is key. Here’s how to do it effectively:
- Organizing Your Scheduled Emails: Visit your drafts folder in Outlook. If you’ve used the schedule send feature, your emails waiting to be sent will be here. Give clear subject lines to easily identify them later.
- Tracking Delivery Times: If you're scheduling emails, it's crucial to monitor their delivery time. In the message remains window, check the properties box of each email to confirm or adjust the scheduled delivery date and time.
- Editing Scheduled Emails: Need to make changes? You can edit any scheduled email up until its delivery. Simply access it from the outbox or draft folder, make your edits, and confirm the delivery time.
Which is better Immediate or Scheduled Message Delivery
Deciding between immediate and scheduled message delivery can influence how your emails are perceived and engaged.
Let’s explore when to use each:
- Immediate Delivery: Ideal for urgent or time-sensitive information. When you click send in the message in the pop-up window, your email is dispatched instantly. This approach suits quick, direct communication needs.
- Scheduled Delivery: Perfect for planning emails in advance. Whether you're working late or need to send a reminder at a future date, the delay delivery options in Outlook can be invaluable. Schedule sending email messages and it will be sent at the specified time.
In conclusion, mastering Outlook's features, such as the 'schedule send' function, can significantly enhance your email management. By clicking 'manage rules', you can automate many processes, seamlessly integrating with Microsoft Outlook's robust platform. Utilizing the 'send button' effectively ensures your messages are dispatched at the right moment. Remember to explore the 'windows scheduling' options for a more integrated experience. Pay attention to each 'rule description' for better customization, and don't overlook the handy 'calendar icon' for setting dates.
Starting with a 'blank rule' offers unparalleled flexibility, while scheduling emails for a 'later date' optimizes your communication strategy. The 'schedule button' is your final step in this process. Always consider the importance of an 'underlined phrase' to highlight key points in your messages. The 'options arrow' unveils further functionalities, and the ability to 'select send' later refines your scheduling. These features, combined, transform how you handle messages in Outlook, ensuring efficiency and effectiveness in your email communications.