
.svg)
.svg)
.svg)
Introduction to Gmail SMTP Settings
Understanding Simple Mail Transfer Protocol (SMTP)
SMTP, which stands for Simple Mail Transfer Protocol, is like the rulebook for sending emails.
It's a set of guidelines that helps move emails from your own mail account to one or many other email addresses.
Without the SMTP servers, we wouldn't be able to send emails at all. Here's why:
Email Protocol: Think of an email protocol like the rules of a game. In the game of sending emails, google's SMTP server is the rulebook that tells everyone how to play. It sets the rules for how information is exchanged between email accounts.
Communication Between Servers: SMTP isn't just about rules; it's also about communication. It helps different email servers (like the post offices of the internet) talk to each other.
It tells a server how to find the right server to deliver your email and what to do once it arrives.
So, SMTP is super important because it makes sure that when you send an email, it knows where to go and how to get there, following a set of rules that all email services agree on.
They Why of Gmail SMTP: When and Why to Configure SMTP Settings
The Gmail SMTP server is like a special postman for your emails.
It lets you send emails from your Gmail account, but you can use other email programs like Outlook or Thunderbird to do it.
Plus, the really cool thing is that you can use this Gmail server to send emails from your WordPress website without paying anything extra!
To explain a bit more:
SMTP's Role: SMTP is like a bridge that lets your website or email program talk to Gmail.
It makes sure your emails are sent out the right way.
When to Set Up Gmail SMTP:
- Using External Email Clients: If you want to connect your Gmail account to send emails from programs like Microsoft Outlook or Thunderbird.
- Sending Website Emails: When you need to send automatic emails from your website, like order confirmations or sign-up alerts.
- WordPress Emails: If you're using a WordPress site and want to send emails from it, you'll need to set up a special plugin (like the Gmail SMTP plugin) for this.
So, setting up your Gmail SMTP settings is key for these situations to make sure everything runs smoothly with your emails.
Understanding Each Part of SMTP Settings
When you're setting up your outgoing server and SMTP server (Simple Mail Transfer Protocol) for Gmail, you'll come across various terms and options. Understanding each part is crucial for a smooth setup. Here's a breakdown of the key components:
Server Address
This is the address of the Gmail SMTP server. It's like the specific location where your emails start their journey. For Gmail, it is your Google account's gmail smtp server address, usually smtp.gmail.com.
Username
This is your full Gmail custom email address. For example, if your custom email address is example@gmail.com, that's what you would send your mail account that you'll enter here. It's like your identity in the email world.
Password
This is the password you use to log into your Gmail account. It's key for ensuring that only you can access and send emails from your account.
Port Number
Think of the port number like a door. Emails go out of this door to reach the internet. Gmail typically uses port 587.
Alternative Port Number
Sometimes, the main port might not work (like a blocked door), so you have another option: port 465. This can be used with or without SSL (Secure Sockets Layer), which adds a layer of security to your emails.
TLS (Transport Layer Security)
This is a security feature. When TLS is enabled, it encrypts your emails during transit, protecting them from being read by others.
Internet Protocol
This part deals with whether dynamic IPs are allowed or not. A dynamic IP address can change, unlike a static one which stays the same. Some email setups might have restrictions on this.
Different SMTP methods in Gmail
To start using Google's free SMTP server, for sending emails, you have three options:
- Google Workspace SMTP Relay Service: This is a choice for those using Google Workspace (previously known as G Suite). It's a bit more advanced and suitable for larger or more complex email needs.
- Using Gmail's SMTP Server: This is the main focus here. It's straightforward to set up SMTP using your regular Gmail account.
- Restricted Gmail SMTP Server: This option offers a more limited service than the full SMTP server. It's useful for specific scenarios where you don't need the full capabilities of the standard SMTP server.
In this guide, we'll focus on the Gmail SMTP server because:
No Google Workspace Needed: You don't need a paid Google Workspace account to use it.
Send to Any Email Address: Unlike the restricted Gmail SMTP server, you can send emails to any address, not just Gmail or Google Workspace users.
Secure and Reliable: It offers the same level of security as Google Workspace SMTP settings.
Supports Gmail Alias: You can also send messages and emails from a Gmail alias, allowing for more flexibility and a professional appearance.
The Gmail SMTP Method
Step 1: Setting Up App Password
Note: If you have two-factor authentication activated on your Gmail account, you'll need to set up an App Password to configure the Gmail SMTP server settings. This is crucial for users who have secure apps or email clients that don't support two-step verification codes.
Why App Passwords? Due to two-factor authentication, secure apps or other mail client clients might be blocked from accessing your Gmail account. An App Password allows these apps to connect to your Gmail account securely.
If You Don't Use Two-Factor Authentication: You can skip these steps if you haven't enabled two-factor authentication on your Google account.
Creating an App Specific Password:
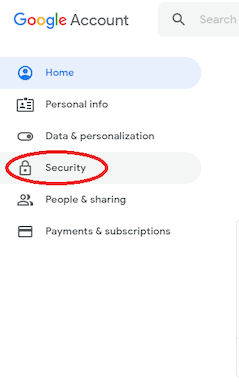
- Access Security Settings: Go to your Google Account and select 'Security' from the left panel.
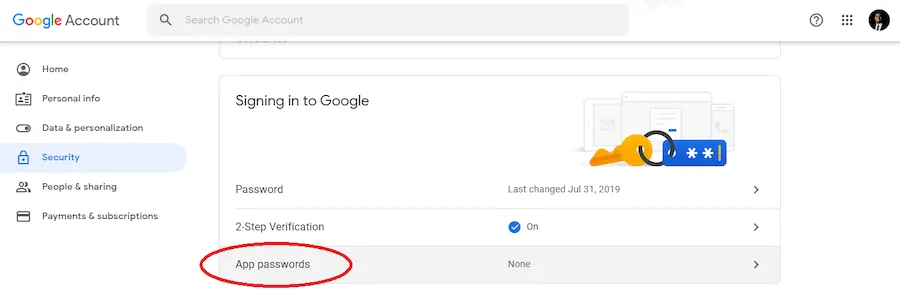
- Find App Passwords: Under the 'Signing in to Google' tab, choose 'App Passwords'.
- If you don't see this, it could be because:
- You haven't set up two-factor authentication.
- You're using security keys only for two-factor authentication.
- Your account is managed by an organization (like work or school).
- You have Advanced Protection turned on for your account.
- Select App and Device: Click 'Select app' and choose the app you're using. Then click 'Select device' and pick the device you're using.
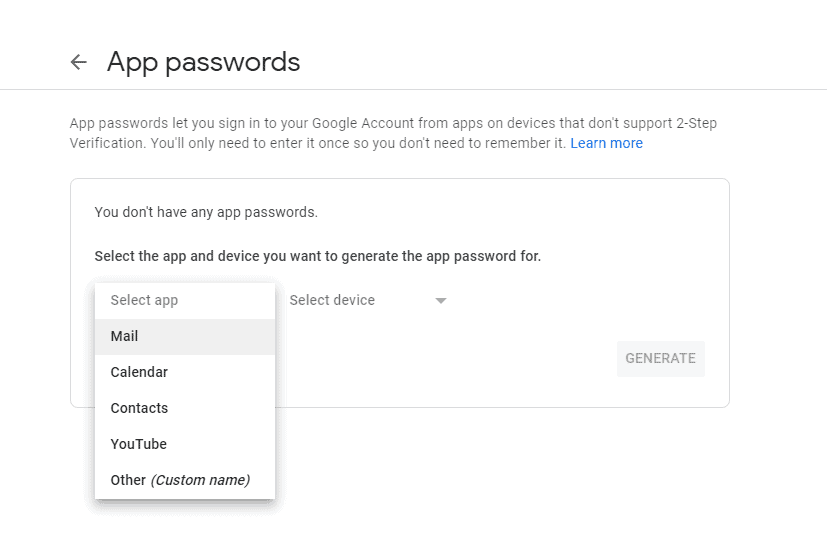

- Generate the Password: Click on 'Generate'. You'll see a 16-character code in a yellow bar – this is your App Password.

- Finalize the Setup: Enter the App Password as instructed, then click 'Done'.
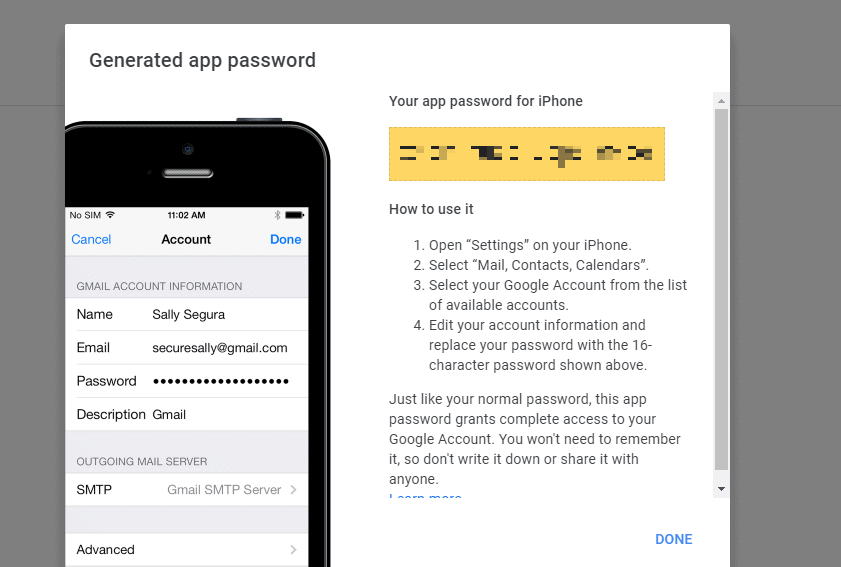
Remember: You won't need to memorize this App Password, as it's typically used just once to link your account to the app or email client.
Step 2: Integrating Gmail SMTP with Email Clients
Adding Your Gmail Account: Go to the 'File' tab, select 'Add Account,' and enter your Gmail email address.

Once you've linked your Google account to your email client, you'll need to set up the email server and settings for sending and receiving emails. Here's how to input the Gmail SMTP server settings:
Configuring SMTP for Outgoing Mail:
SMTP Outgoing Mail Server: smtp.gmail.com
Use Authentication: Yes
Secure Connection: Choose TLS or SSL based on your email client or website's SMTP plugin
Gmail SMTP Username: Your full Gmail email address (xxxx@gmail.com)
Gmail SMTP Password: Your Gmail password
Gmail SMTP Port: Use 465 for SMTP SSL or 587 for SMTP TLS
Note: SMTP authentication is crucial as it confirms that your email client is authorized to send emails through the Gmail server.
For bulk email senders, domain authentication might be necessary to avoid your emails' spam folder being marked as suspicious.
Setting Up POP and IMAP for Incoming Mail:
Now that you have set the send outgoing mail server setting, let's configure your email client with Gmail's POP or IMAP settings to receive incoming mail.
A. Setting Up IMAP:
- Log into your Gmail account and click on 'Settings' in the top right.
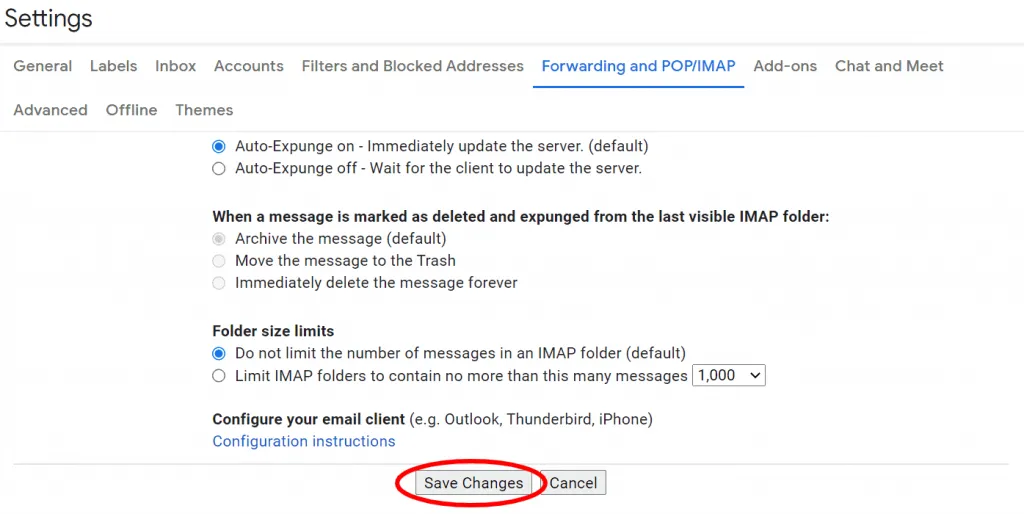
- Go to the 'Forwarding and POP/IMAP' tab.

- Enable IMAP in the 'IMAP Access' section and save changes.

- In your email client, enter these details in the IMAP section:
- Incoming Mail Server (IMAP): imap.gmail.com
- Requires SSL: Yes
- Port: 993
- Display Name: Your name
- Username: Your Gmail address (xxxx@gmail.com)
- Password: Your Gmail password
B. Setting Up POP:
- Follow the first two steps as in the IMAP setup.
- In the 'POP Download' section, choose to enable POP for all mail or just for new mails.
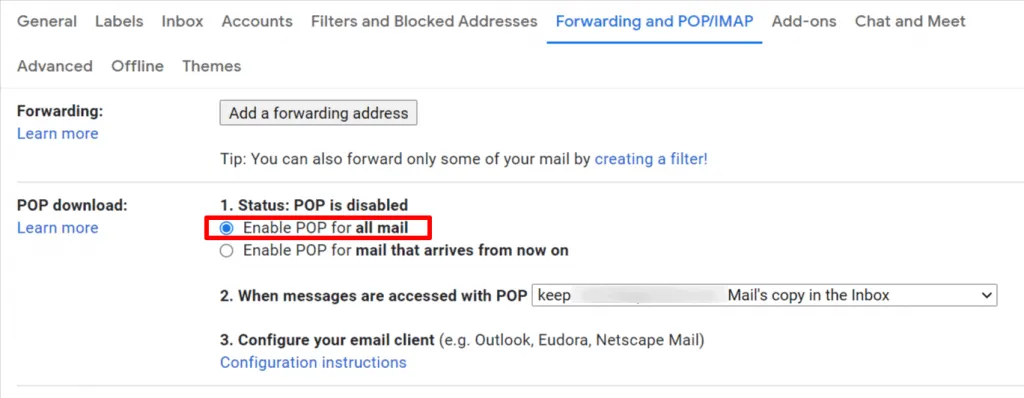
- Save your changes.
- In your email client, enter these details in the POP section:
- Incoming Mail Server (POP): pop.gmail.com
- Requires SSL: Yes
- Port: 995
- Server Timeouts: Set to more than 1 minute (5 minutes recommended)
- Display Name: Your name
- Username: Your Gmail address (xxxx@gmail.com)
- Password: Your Gmail password
With these settings, you can now send outgoing emails and receive incoming mail through your preferred email client, such as Microsoft Outlook.
Understanding and correctly configuring these email protocols is key to efficient email management.
Advanced SMTP Configurations and Troubleshooting
G-suite Relay SMTP Settings: Configuration and Limitations
Configuring the G-suite Relay SMTP settings for your Google Workspace account is a strategic move for handling bulk emails and managing a professional email account.
However, it's essential to be aware of its limitations:
- Daily Email Limit: Google Workspace users are restricted in the number of emails they can send daily.
- SMTP Server Address: Correctly input the Gmail SMTP server address for a smooth operation.
- Authentication: Use your full Gmail address and Gmail SMTP password for secure access.
These settings are vital for maintaining a secure connection and ensuring your emails are delivered efficiently.
Resolving Common SMTP Server Errors
Dealing with SMTP server errors can be a hurdle in managing your email communications. Here are some common challenges and solutions:
Error Messages with SMTP Server:
Solution: Double-check your Gmail outgoing SMTP server connection settings, including the outgoing server address, username, and password.
SMTP Port Issues:
Solution: For SSL connections, use port 465; for TLS, use port 587.
Less Secure Apps Access:
Solution: Users with a free Gmail account should enable 'Less secure apps' for compatibility.
Remember, configurations might vary slightly based on your email client, like Microsoft Outlook.
It's crucial to refer to specific guides for detailed steps on setting up Gmail SMTP server settings.
Implementing Gmail SMTP in the WordPress sites
Integrating the Gmail SMTP server into your WordPress site is a strategic move for reliable email delivery. Here's how to set it up using the WP Mail SMTP plugin, ensuring your WordPress emails are efficiently managed:
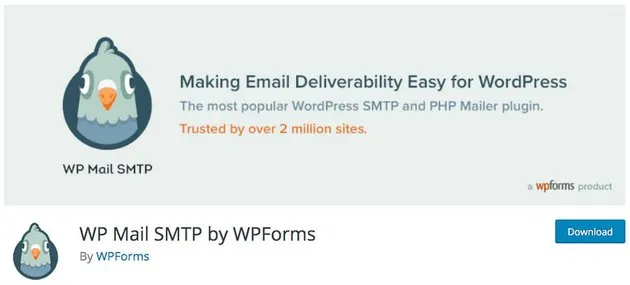
Step 1: Install the WP Mail SMTP Plugin
- Plugin Selection: Choose the WP Mail SMTP by WPForms, a widely-used plugin supporting over 2 million websites.

- Configuration: Activate the plugin, then navigate to WP Mail SMTP > Settings in your WordPress dashboard. Select 'Gmail' in the mailer settings to use the Gmail SMTP server.
Step 2: Create a Google App for Gmail API
- Purpose: To send emails from your WordPress site using the Gmail SMTP server, a Google App is essential for a secure connection.
- Process:
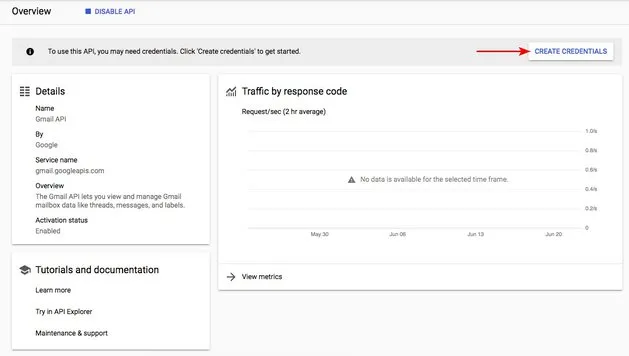
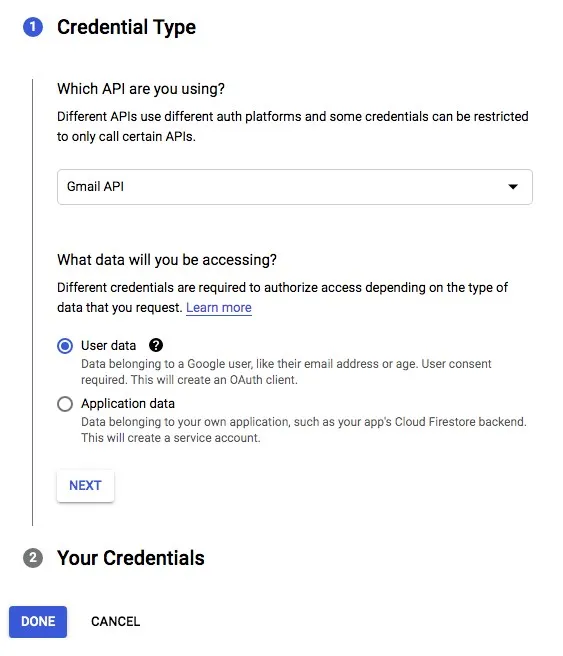
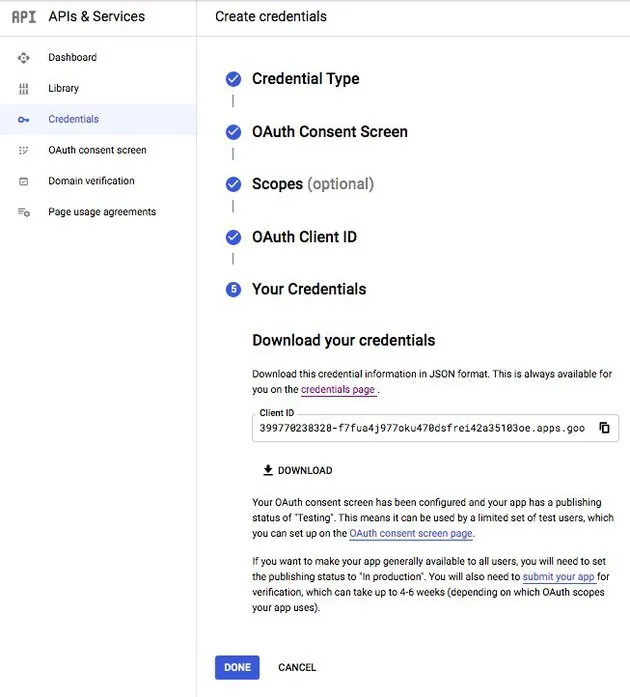
- Visit the Google Developers Console to create a new project.
- Enable the Gmail API and configure the OAuth consent screen.
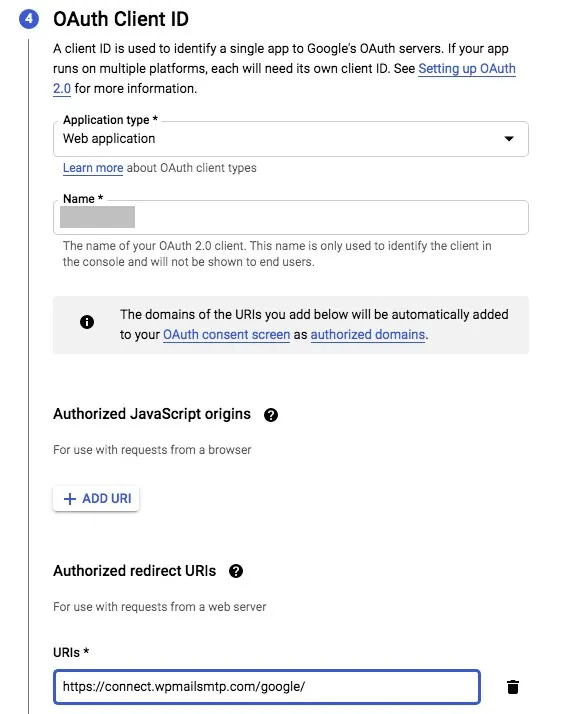
- Add your WordPress site's URL under 'Authorized Javascript origins'.
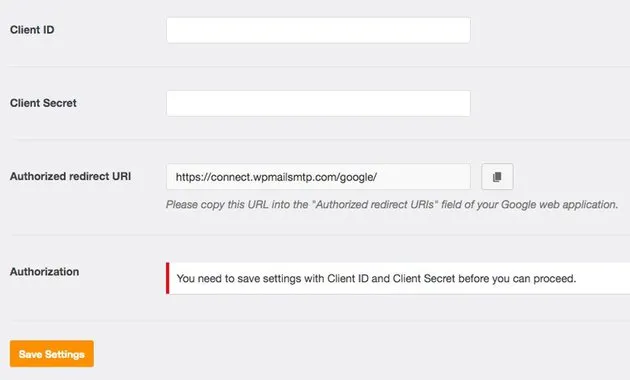
- Note the 'Authorized redirect URL' from the WP Mail SMTP settings; this is crucial for connecting your WordPress site to the Gmail SMTP server.


Step 3: Configure Gmail SMTP Settings in WordPress
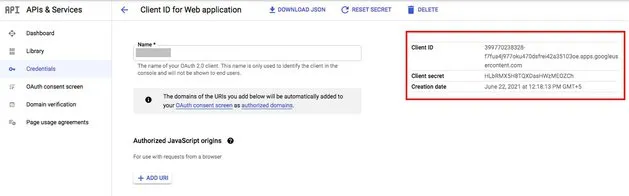
- Integration:
- Enter the Google App's Client ID and Client Secret into the WP Mail SMTP settings in your WordPress dashboard.

- Authorize the plugin to send emails using your Gmail account, ensuring a secure connection.
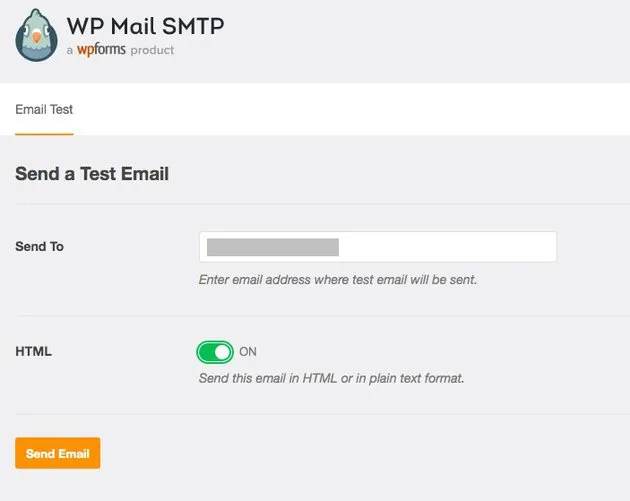
- Test the setup by sending a test email from WP Mail SMTP > Tools, confirming the use of the Gmail SMTP server for outgoing emails.
By following these steps, you leverage the Gmail SMTP server for your WordPress site, enhancing email reliability and security.
This setup is particularly beneficial for users with a free Gmail account, as it provides a robust email server solution at no additional cost.
Google SMTP Server Settings on Mobile
Gmail SMTP server address: smtp.gmail.com
Gmail SMTP name: Your name
Gmail SMTP username: Your Gmail or Google address
Gmail SMTP password: Your Gmail or Google password or account password
Gmail SMTP port (TLS): 587
Gmail SMTP port (SSL): 465
If asked:
Requires SSL: Yes
Requires TLS: Yes
Requires / Use authentication: Yes
Requires / Use secure connection: Yes
Optimizing Gmail SMTP for Free and Efficient Email Services
Benefits of Free Gmail SMTP Service
Utilizing the free Gmail SMTP service offers a plethora of advantages, especially for those managing a professional email account or a small business. Let's delve into why this free smtp server is a game-changer:
- Cost-Effective: For starters, it's free! This is particularly beneficial for startups or individuals who need a reliable email server without the added expense.
- Wide Reach: Unlike restricted Gmail SMTP services, the free version allows you to send outgoing emails to any email address, not just those within the Gmail or Google Workspace ecosystem.
- Security: With Gmail's robust security protocols, your outgoing messages are protected, ensuring a secure connection for your email communications.
This service is not just about sending emails; it's about doing so efficiently and securely, without straining your budget.
Enhancing Email Efficiency with Gmail SMTP
To truly harness the power of Gmail SMTP settings, understanding how to optimize them for maximum efficiency is key. Here’s how:
- SMTP Settings Configuration: Properly configuring your Gmail SMTP server settings, including Gmail's SMTP server address and Gmail SMTP port, is crucial. This ensures your emails are delivered swiftly and securely.
- SMTP Authentication: Using your Gmail address and Gmail SMTP password for authentication adds an extra layer of security, which is especially important for sending sensitive information.
- Compatibility with Email Clients: Gmail SMTP seamlessly integrates with various email clients, including Microsoft Outlook and mail clients on mobile devices, enhancing the flexibility of your email management.
By optimizing these settings, you ensure that your outgoing emails are not only sent but are delivered efficiently and securely, enhancing your overall email experience.